Over the years you may have published a large number of blog posts.
If there are posts that are more than three years old, you may find that some of the content on those old posts is no longer valid and needs to be updated.
On WordPress, you can do this easily. All you need to do is to go into the “Edit Post” mode in WordPress, change your content, and hit “Update” to have the new content show up.
The problem with this approach is that WordPress still shows the original post date to the readers. This is usually not what we want because users may look at the old date and quickly assume that the information contained there is out of date, and that is exactly the opposite of what we want.
What we want to do is to update the publish date to the most recent date it is published, and change the WordPress code so that it shows the “Last Updated On” date instead of the “Posted On” date. This way, not only will users see that the post is recent, but it will also bring the blog post up to the top of your home page so it gets more attention from your readers.
There are two things you need to do:
1. Change the “Published On” field on your Edit screen. You need to do this for each post you update.
2. Modify the PHP code of the theme you are using so that it shows “Last Updated On” instead of “Published On.” You’ll only need to do this once.
Change the “Publish On” field on your Edit screen
This is a fairly easy thing to do. On the upper right-hand corner in the “Edit Post” mode, you’ll find the publish timestamp in a drop down box (see figure below).
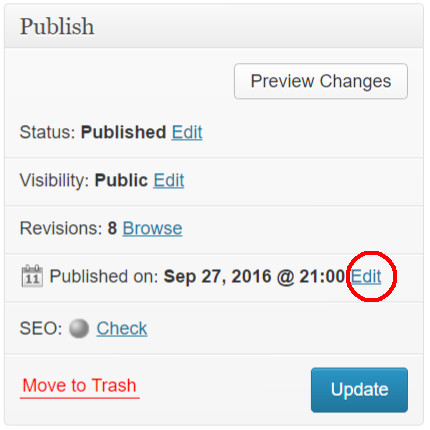
Click on the “Edit” link (highlighted in red), and you will see five drop-down boxes that allow you to change the year, month, date, hour, and minute of the post date.
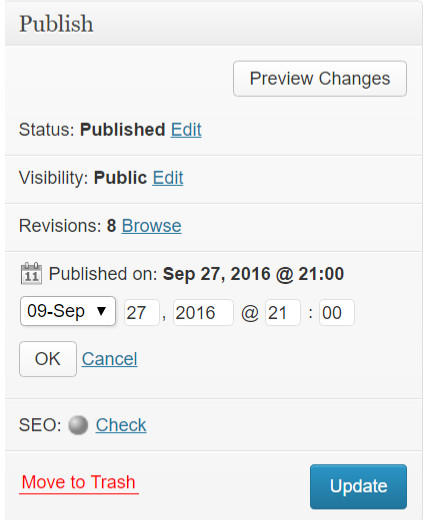
Make the appropriate changes and click the “OK” button. Now the Post Date of the blog entry will be changed to what you just specified.
Modify the PHP code
Changing the PHP code? This may sound terrifying if you are not a PHP programmer, but you should not worry because you will not be altering any functionality. What you’ll be changing is simply the text output of your PHP code.
You can modify the PHP code directly in the WordPress Dashboard. The steps are as follows:
1. Login to your WordPress Dashboard.
2. Click on “Appearance” on the left navigation.
3. Click on “Editor” in the sub-menu that shows up under “Appearance.”
4. On the right, click on “template-tags.php.”
5. Change “Posted On” to “Last Updated On” in the text box (see image below).
6. Click “Update File” to save the change.

Now your post will have a “Last Updated” date instead of “Posted” date.
Please note that the location of this code may be in different places depending on the particular theme your blog uses. If your theme does not have the “template-tags.php” file or if that file does not contain what you are looking for, try looking for it in other files.
If you have shell access to your hosting environment, you can edit the relevant file directly.