I recently converted a website from HTTP to HTTPS using CloudFlare’s Universal SSL, which is free and does not require installation on the server, two factors that had prevented me from doing this previously. Here are the steps I took to convert my website to HTTPS:
1. Update all internal links to point to the HTTPS version of the asset. This includes the following:
- Canonical URL
- Internal links
- CSS
- Javascript
- Images
- External CSS resources such as Google fonts
Depending on how complex your website is, this effort could range from a few minutes (if you have a very small website) to a big project that takes several months (if you are a large enterprise). However, if you belong to the latter category or if you are doing ecommerce, it is a good idea to go with one of the commercial SSL certificates rather than getting SSL through CloudFlare.
2. Add your website to CloudFlare. If you do not have an account, sign up for one (it’s free). Once you sign up for an account, add your domain name to your account.
3. CloudFlare will scan your DNS records. If this is the first domain you are adding to the account, you’ll be shown a video. CloudFlare will inform you once it has finished scanning your DNS records.
4. Click on the “Continue Setup” button and review the DNS records CloudFlare found.
5. In the next screen, you can add any missing DNS records. Once CloudFlare has all the DNS records, click the “I’ve added all missing records, continue” button to move to the next step.
6. On the “Choose your setting:” window, select the Free plan, and make sure you see “SSL on” to the right. Click the “Continue” button to move to the next step.
7. CloudFlare will tell you the nameservers you should point your domain to.
8. Open up a new browser window. Login to your domain registrar and update the nameserver information. CloudFlare has step-by-step instructions for how you can do this for many domain registrars here.
9. Once you are done updating the nameserver, go back to Cloud Flare and click the “I’ve updated my nameserver, continue” button.
10. You will get a “Congratulations! You’ve completed the setup” message.
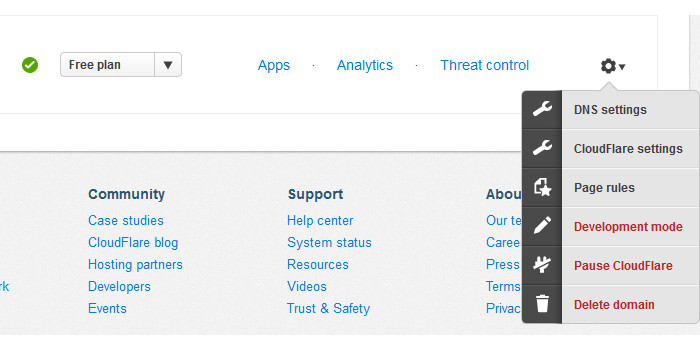
11. Click on the Setup icon and click on “Page rules”. If this option is not yet available, wait for a couple of minutes, refresh the screen, and you should see it.
12. Turn on “Always use https”. You’ll also need to enter a string to apply this rule to. Simply enter your domain name so your entire domain will be shown in HTTPS. Click the “Add rule” button. You are done setting up in CloudFlare.
13. Upload your updated files to your web server.
14. Even though CloudFlare says SSL in the free plan will take up to 24 hours to activate, it only took about 10 minutes for me. So, wait for 10 minutes or so, then test your website by trying to go to the secured version. If you find any script not working, you’ll want to make sure you are calling that script via HTTPS. For example, if your Adsense ads are not showing up, simply go to your Adsense account and use the latest code.
This is it! When you click on the padlock, you should see a popup that says, “Verified by: Comodo CA Limited”.
Now you may be thinking, “How about setting up 301 redirects? Why is that not one of the steps?” The answer is that this is taken care of in step 12. This is because, while the outside connection to CloudFlare is via HTTPS, the communication between CloudFlare and your web server is still HTTP. Therefore, if you try to set up 301 redirects, you’ll end up in a redirect loop, and the site will not render correctly.